Замена колеса
- Wheel changing safety
- Tool kit
- Removing the spare wheel
- Using wheel chocks
- Wheel changing
 Checking the tyre pressure after a repairWheel changing safety

Безопасность при замене колеса
Before raising the vehicle or changing a wheel, make sure that you read and comply with the following warnings:
- Always find a safe place to stop; off the highway and away from traffic.
- Do not jack the vehicle if it is over
a metal grating or manhole cover.
Make sure the vehicle is on firm, level ground.
- Make sure that the jack is on firm, level ground.
- Apply the Electric Parking Brake (EPB). Engage Park (P) on automatic vehicles, select first or reverse gear on manual vehicles.
- Switch on the hazard warning lamps.
- Make sure that the front wheels are in the straight ahead position, and engage the steering lock.
- Disconnect any trailer/caravan from the vehicle.
- Make sure that all passengers, and animals, are out of the vehicle and in a safe place away from the highway.
- Place a warning triangle at a suitable distance behind the vehicle, facing towards oncoming traffic.
- Remove the spare wheel before jacking the vehicle, to avoid destabilising the vehicle, when raised.
- Never place anything between the jack and the ground, or the jack and the vehicle.
WARNING - THAT NO PERSON SHOULD PLACE ANY PORTION OF THEIR BODY UNDER A VEHICLE THAT IS SUPPORTED BY A JACK.
- Take care when loosening the wheel nuts. The wheel brace may slip off if not properly attached, and the wheel nuts may give way suddenly. Either unexpected movement, may cause an injury.
- Take care when lifting the spare wheel, and removing the punctured wheel. The wheels are heavy and can cause injuries if not handled correctly.
- Position the jack from the side of the vehicle, in line with the appropriate jacking point.
- Do not attempt to raise the vehicle unless the jack head is fully engaged in the jacking point.
- Only jack the vehicle using the approved jacking points.
- The jack is designed for wheel changing only. Never work beneath the vehicle with the jack as the only means of support.
- Always use correctly rated vehicle support stands, before putting any part of your body beneath the vehicle.
- Always use the complete jacking lever assembly throughout the tyre changing process, to minimise any chance of accidental injury.
- Do not start or run the engine while the vehicle is supported only by a jack.
Wheel changingTool kitКомплект инструментов
5 seat vehicles
Lift the loadspace floor to access the temporary use spare wheel and tool kit.

- Temporary use spare wheel locking ring.
- Temporary use spare wheel retaining bolt.
- Tool kit retaining bolt.
- Jack.
- Wheel brace.
Secure the spare wheel, or the removed wheel, in the correct position using the retaining bolt.
7 seat vehicles
Lift the loadspace floor to access the tool kit.

- Wheel chocks.
- Wheel brace.
- Locking wheel nut adaptor.
- Jack.
- Winch handle for lowering the temporary use spare wheel.
- Rear bumper cover removal tool.
Note: Examine the jack occasionally, clean and grease the moving parts, particularly the screw thread, to prevent corrosion.
Wheel changing safetyRemoving the spare wheelСнятие запасного колеса
- Remove the temporary spare wheel prior to jacking the vehicle, to avoid destabilising the vehicle when raised.
- Wheels are heavy and if handled incorrectly may cause injury. Use extreme caution when lifting or manoeuvring the wheels.
- After wheel changing, always secure the tools, chocks, jack and replaced wheel in their correct stowage positions. Such objects, if not properly stowed, can become flying missiles in a crash or rollover, potentially causing injury or death.
5 seat vehicles
Always secure the temporary spare wheel, or the removed wheel, in the correct position using the retaining bolt.
- Lift the loadspace floor to access the temporary spare wheel.
- Turn the temporary spare wheel locking ring counter-clockwise to gain access to the retaining bolt.
- Turn the retaining bolt counterclockwise until it comes free.
- Remove the temporary spare wheel.
7 seat vehicles
The wheels are extremely heavy.
Always take care when operating the spare wheel winch while removing or stowing the temporary spare wheel and the road wheel.
- It is recommended that the road wheel is always stowed underneath the vehicle following a puncture.
- Always stow a road wheel, and the temporary spare wheel with the outer face of the wheel facing upwards.
- Do not operate the winch (retracting or extracting the cable) without pre-tensioning the cable as you do so. Doing so may cause damage to the winch. This pre-tensioning can be achieved, either with the weight of a temporary spare wheel, a road wheel, or by maintaining a tension using your hand.
If when using your hand to tension the winch cable, take care not to trap your fingers.
Do not use power tools to lower the temporary spare wheel. Doing so may damage the winch mechanism.
The temporary spare wheel is located underneath the rear of the vehicle. The winch to lower the spare wheel is located in the bottom of the tool tray.
Before lowering the temporary spare wheel, remove the cover in the rear bumper.

- Using the special tool located in the tool tray, remove the 2 fixings (1) and store them in a safe place.
- Remove the cover, easing it off the 4 retaining clips (2).
Note: The cover cannot be refitted after the full size wheel is to be stowed under the vehicle. Store the cover in the loadspace.

To remove the spare wheel:
- Remove the jack to allow access to the temporary spare wheel winch.
- Fit the winch handle to the temporary spare wheel winch and rotate counterclockwise to lower the spare wheel.
Note: To avoid damage to the side trim and third row seats (if raised), slide the winch handle through the tube to shorten the handle.
- Rotate the winch handle until the temporary spare wheel is on the ground and the winch cable is slack.
Note: Do not attempt to turn the winch beyond the physical stop.
To release the wheel from the winch:
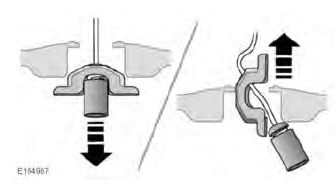
Lift the temporary spare wheel and release the winch cable by passing it through the centre of the wheel, as shown in the above graphic.
To stow the removed road wheel:
- Remove the centre cap from the road wheel and store it in a safe place.
- Position the road wheel underneath the rear of the vehicle, with the outer face of the road wheel facing upwards.
- Pass the winch cable through the centre of the wheel.
- Start to turn the winch handle clockwise to take the slack out of the cable, then make sure the cable end is seated correctly before continuing to raise the wheel.
- Continue to rotate the winch handle until the road wheel is in the stowed position.
- Remove the winch handle and stow all of the tools and the jack in the tool tray.
Note: The bumper cover cannot be refitted to the vehicle with a stowed full sized wheel.
Operating the winch without a road wheel attached
When extracting the winch cable after the winch cable has been retracted without a road wheel attached, operate the winch as follows: Fit the winch handle to the temporary spare wheel winch and rotate counterclockwise to extract the cable, while also applying tension by pulling on the end of the winch cable.
Note: If while the cable is being extracted, the winch feels tight or locks up, stop winding and wind back, at least one full turn. Apply a tension on the cable to release any cable slack, if necessary, giving it a sharp tug. Try the winch again and continue if the mechanism is free to operate. Repeat, if the winch feels tight or locks up again.
If the winch feels tight or locks up, stop winding and wind back, at least one full turn. If this fails to free the winch mechanism, do not continue, as damage may be caused to the winch.
Refitting the bumper cover
When the temporary spare wheel is stowed underneath the vehicle, refit the bumper cover as follows:
- Locate the 4 retaining clips on the cover into the slots in rear bumper.
- Locate the 2 fixing points in the underside of the cover to the bumper and fasten the cover to the bumper using the fixings. Tighten the fixings with the special tool.
IMPORTANT - USE OF SPARE TYRE
- Adhere to the instructions on the temporary-use spare warning label, affixed to the wheel. Failure to do so may cause vehicle instability and/or tyre failure.
- Where fitted, the temporary-use spare wheel is FOR TEMPORARY USE ONLY.
- Drive with caution while the temporary-use spare wheel is fitted.
- Make sure that an original size wheel and tyre are fitted as soon as possible.
- Do not fit more than one temporary-use spare wheel at any one time.
- Do not exceed 80 km/h (50 mph) while the temporary-use spare wheel is fitted.
- The temporary-use spare wheel must be inflated to 4.2 bar (60 psi, 420 kPa) and cannot be repaired.
- Dynamic Stability Control (DSC) must be switched on while the temporary-use spare wheel is in use.
- Traction devices, such as snow chains, cannot be used with a temporary-use spare wheel.
Tool kitUsing wheel chocksИспользование противооткатных упоров
Note: Not all vehicles have wheel chocks supplied as part of the tool kit.
Wheel chocks are a useful addition to a vehicle's tool kit. Note the following advice when using wheel chocks:
- Before raising the vehicle, the wheel diagonally opposite the one to be removed must be chocked.
- Always chock the wheels using suitable wheel chocks. Place the chocks on both sides of the wheel diagonally opposite the wheel to be changed.
- If jacking the vehicle on a slight slope is unavoidable, place the chocks on the downhill side of both wheels on the axle not being raised.
LOCKING WHEEL NUTS
Do not use air tools or power tools to remove or to re-fit the locking wheel nut. Doing so may damage the locking wheel nut or the adaptor.
Locking wheel nuts can be removed and installed using only the special adaptor provided.
Note: A code number is stamped onto the underside of the adaptor. This number should be recorded in the service book, supplied with the literature pack. If a replacement adaptor is required, you will be asked to quote this number.

To release:
- Insert the wheel nut adaptor into the locking wheel nut, making sure that it is fully engaged.
- Locate the wheel brace over the adaptor and unscrew the wheel nut half a turn counter-clockwise.
- After raising the vehicle on the jack, remove the locking wheel nut.
Note: When the vehicle is first supplied, the wheel nut adaptor may be stored in the glovebox. If this is the case, the wheel nut adaptor must be moved to its correct storage position in the loadspace, as soon as possible.
Removing the spare wheelWheel changingЗамена колеса
Before raising the vehicle, refer to all warnings at the beginning of this section of the Owner's Handbook.
Before changing a wheel, read and observe the warnings
If your vehicle is fitted with side steps or tubes, DO NOT use them as jacking points.
Note: Your vehicle may be fitted with a tilt sensor, which activates the alarm if the vehicle is tilted in any direction after it has been locked. To lock the doors while changing the wheel, and avoid the alarm activating, the tilt sensor can be temporarily disabled.
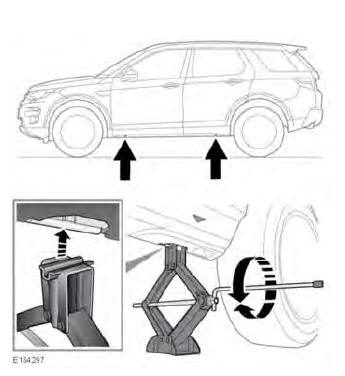
- Before raising the vehicle, use the wheel nut brace to slacken the wheel nuts of the wheel to be replaced, by half a turn counter-clockwise.
- Locate the jack under the relevant jacking point.
Note: Do not allow the jack to contact the sill at any other point, as damage may result.
- Unfold the cranking handle from its stowed position on the jack. Fit the wheel nut brace to the end of the cranking lever.
- Rotate the handle clockwise to raise the jack until the jack, pin locates into the jacking point.
- Raise the vehicle until the wheel is clear of the ground.
- Remove the wheel nuts and place them together where they cannot roll away.
- Remove the wheel and place it to one side. Do not lay the wheel on its face, as this may damage the finish.
- Fit the temporary spare wheel to the hub.
- Re-fit the wheel nuts and lightly tighten them. Make sure the wheel is making contact with the hub evenly.
- Make sure the space under the vehicle is clear of obstructions before lowering the vehicle slowly and smoothly.
- With all of the wheels on the ground and the jack removed, fully tighten the wheel nuts. The wheel nuts must be tightened in sequence (see the illustration below) to the correct torque of 133 Nm.
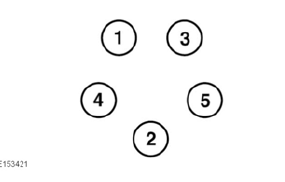
Note: If it is not possible to torque the wheel nuts when a wheel is replaced, they should be set to the correct torque as soon as possible.
Check and adjust the tyre pressure as soon as possible.
Using wheel chocksVehicle recovery